Google Meet is quickly becoming one of our favorite working from home apps. For those of use doing remote work, Google Meet is ideal for creating on-the-fly and scheduled video calls. And since the COVID-19 lockdown, Google has sped up development significantly to match many of the features offered by Zoom and Microsoft Teams. If your company is using Google Suite, chances are you are using Google Meet regularly to connect with colleagues and students.
The only issue is there aren’t a lot of resources around on how to use Google Meet effectively. We have gone ahead and created what we are calling the “Missing instruction manual” for Google Meet, complete with animated gifs to walk you through all of the features the video conferencing app has to offer.
- How to start a Google Meet call from Gmail
- How to schedule a call in Google Calendar
- How to join a Google Meet call
- Setting up your audio and video
- Join as presenter only
- Switching screen layouts
- Pinning user's video
- Turning off your own video
- How to blur or replace your background
- Changing video quality
- How to share your screen in Google Meet
- How to use chat
- How to raise your hand
- Muting participants
- How to use Q&A
- How to use Google Meet breakout rooms
- Enabling captions
- Recording your Google Meet call
- Casting a meeting with Chromecast
- How to use Google Meet on your phone or tablet
- How to join a call from a regular phone number
- Collaborate on screen with Jamboard
- How to track attendance
How to start a Google Meet call from Gmail
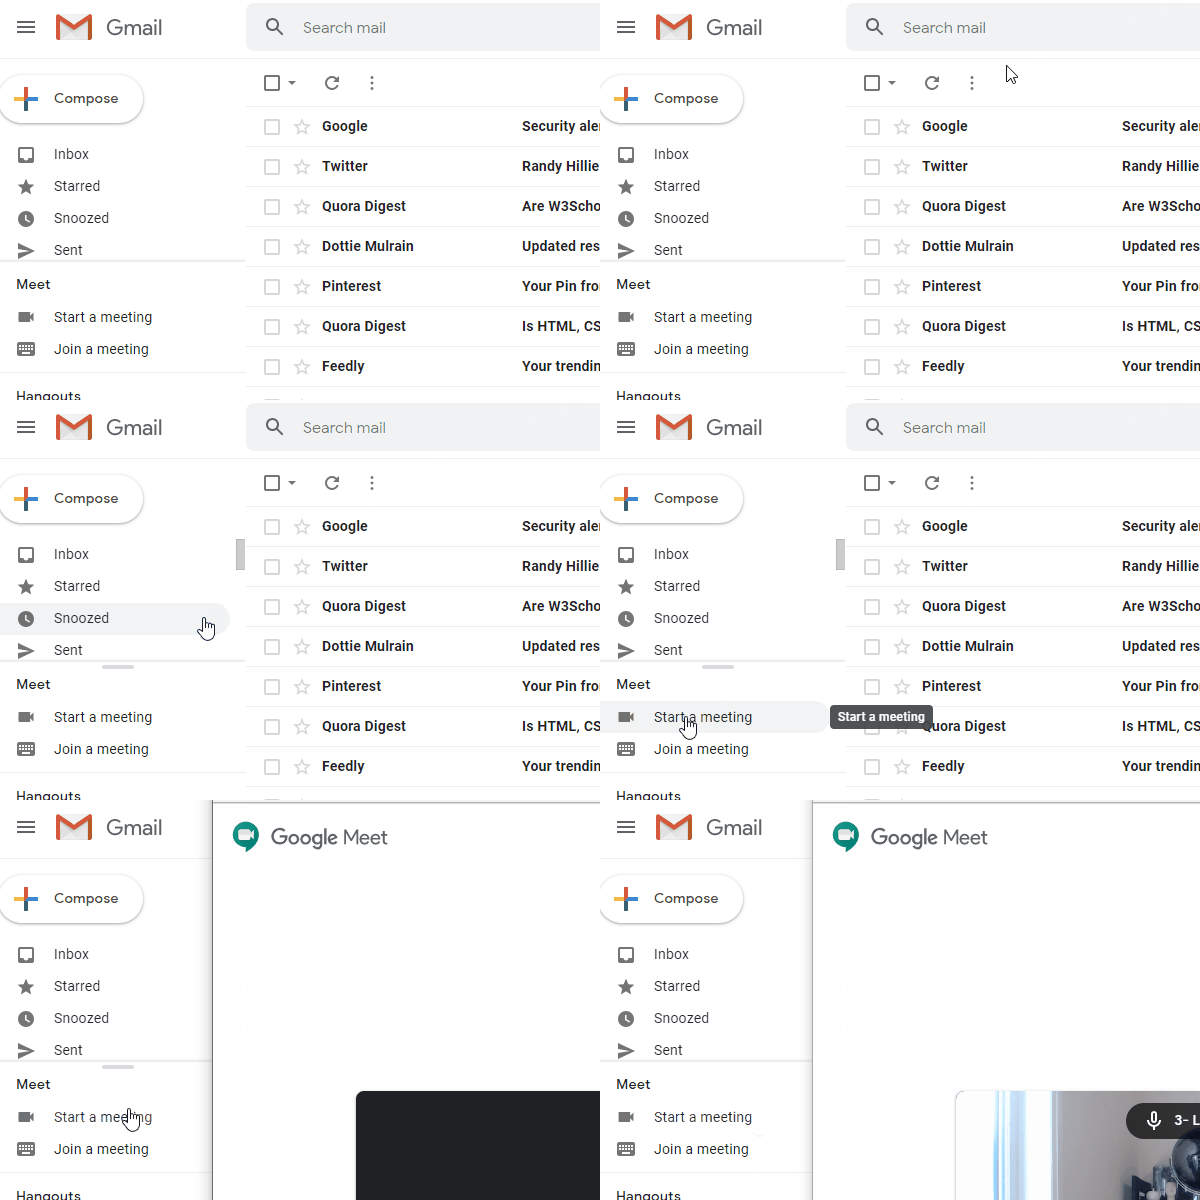
The easiest way to get started with a Google Meet meeting is to start one from your Gmail inbox. This is especially handy when you want to start Google Meet in an ad hoc manner. Say you want to gather your team together for an unplanned meeting that isn’t in their calendar. Simply click on the “Start a meeting” under the Meet section of the left-hand bar in Gmail. This will initiate a brand new Google Meet call. You will, of course, need to invite people to this call or you will just be sitting in there on your own (refer to below).
How to schedule a call in Google Calendar
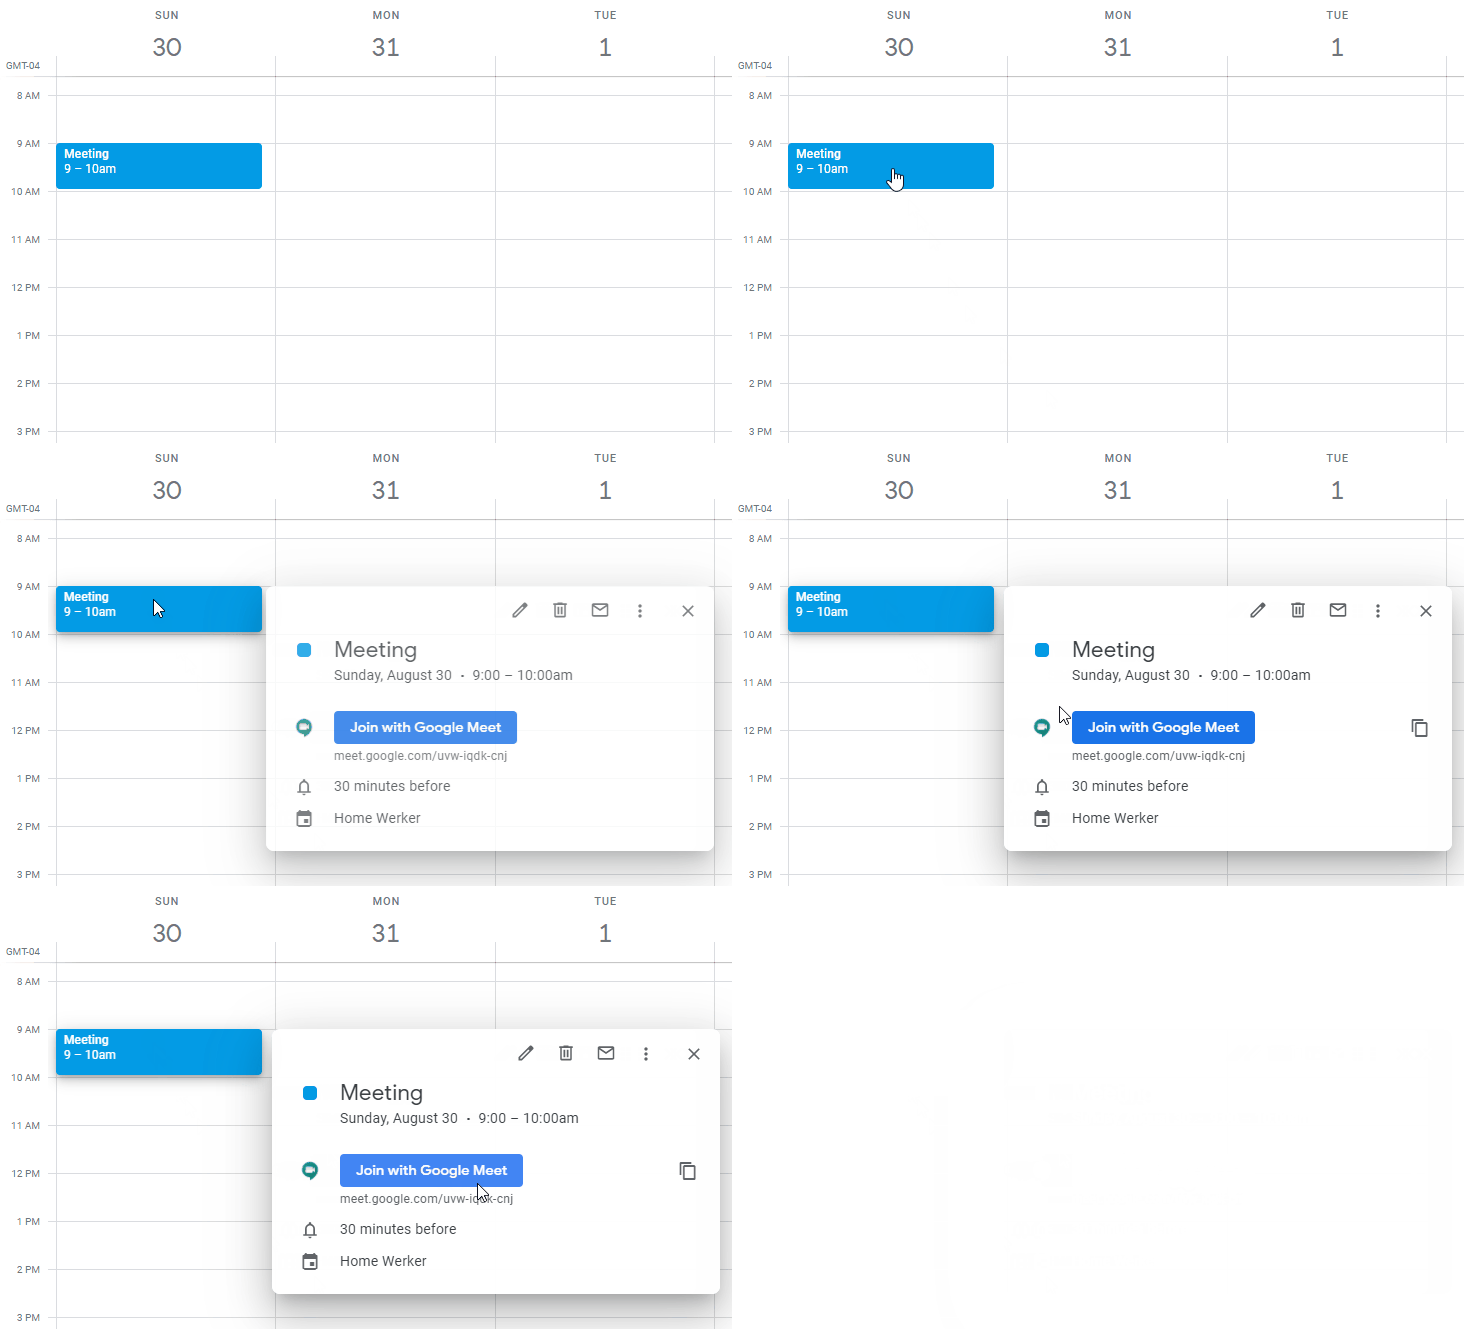
Probably the most useful way of setting up a Google Meet call is to actually attach it to your event calendar invite. So when you create a new meeting in Google Calendar, make sure you click the “Add Google Meet video conferencing” button. This will attach a unique Google Meet room into this meeting that will be clearly visible for you and your colleagues when that meeting is coming up. It’s then as simple as just clicking on the Google Meet link in the meeting invite. The beauty with this method is that it will handle all of the invites to the meeting directly in Google Calendar since Meet is fully integrated.

How to join a Google Meet call
Any Google Meet meeting will have a unique URL. This URL will show up in any meeting that has been scheduled with a Google Meet conference call added in Google Calendar (see above). But you can also just send this link directly to anyone on Google Chat, Slack, text message, or regular email. If the person wasn’t officially invited to the meeting via the calendar, then you may need to “let them in” when they join the call. But this is a handy way to quickly invite someone who may not be in your Google Suite.
If you already have a Google Meet call linked a calendar invite its as simple as clicking the “Join with Google Meet” button in the event details. You can also find this link in the right-hand calendar bar on Gmail.
Setting up your audio and video
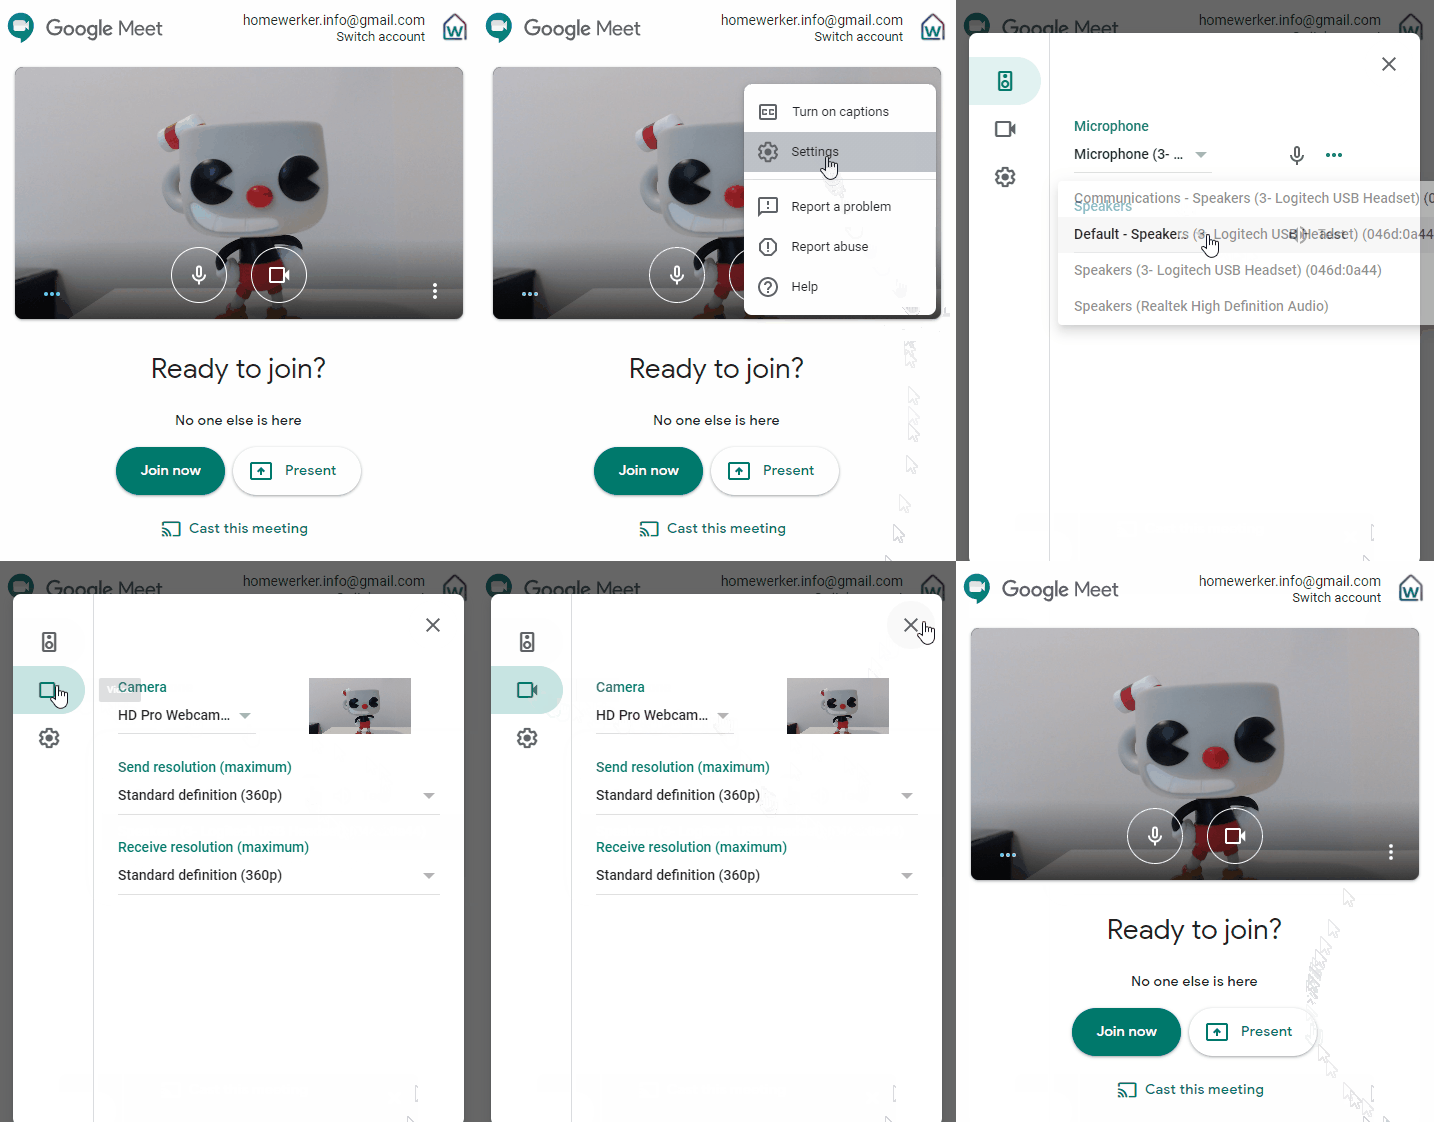
The first thing you should do once you launch Google Meet is to get your audio and video settings correct. Nothing is worse than someone that enters a meeting and they can’t hear you, their video isn’t working and they aren’t using the right speakers… So take some time to familiarize yourself with the “More options” triple dots that show up on your preview video. This gives you a chance to select the correct microphone and webcam before you even join the meeting. This will also be the place to turn off your video or mute yourself before you join (if you wish). Haven’t showered yet? Maybe leave the video off…
You’ll notice in the example below, that there are many different microphones to choose from on this computer. Once you select the one that sounds like the right one, look at the little green dots next to the device you chose. These will bounce up and down as you speak into your mic, confirming that this is indeed a working microphone. The same goes for speakers and your webcam. Give those a test in the same sub-menu as you see below. If this is your first time using Google Meet, you will likely need to allow your web browser to access your camera and microphone.
Join as presenter only
Sometimes you may want to join a Google Meet call as simply a presenter. This means that you would join and screen share a presentation or your desktop but would not be able to speak. This is handy when you need to present on something like a Chrome Box at an office and don’t need to be transmitting your audio/video from your presenting laptop. See the little white button in the example above that says “Present”? That is where you want to click.
Switching screen layouts
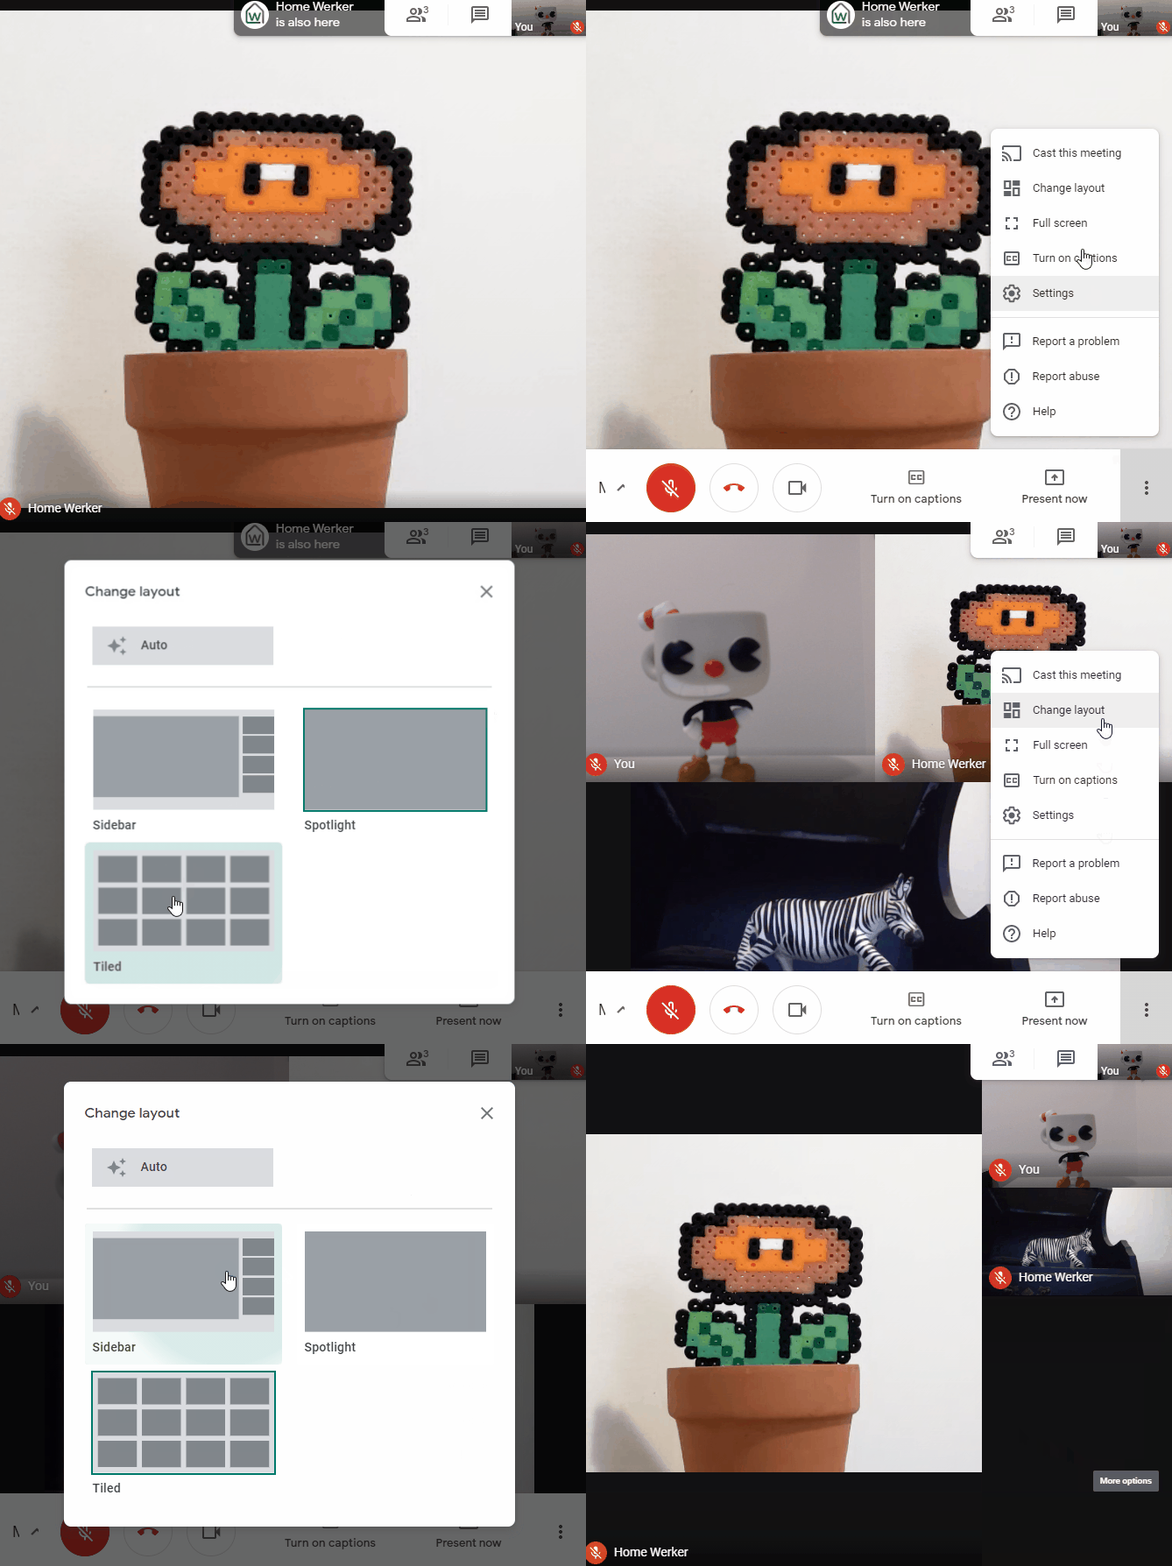
Once you are in, you will want to familiarize yourself with the “More Options” button in the bottom right of the screen. This is where you will access a bunch of different settings, including how to change your screen layout. I tend to like seeing a grid of all of the attendees in Tiled mode (much like Zoom) when there are more than two people. Sidebar mode is nice when someone is presenting. And Spotlight mode is great if you only want to focus on the person speaking.
Pinning user’s video
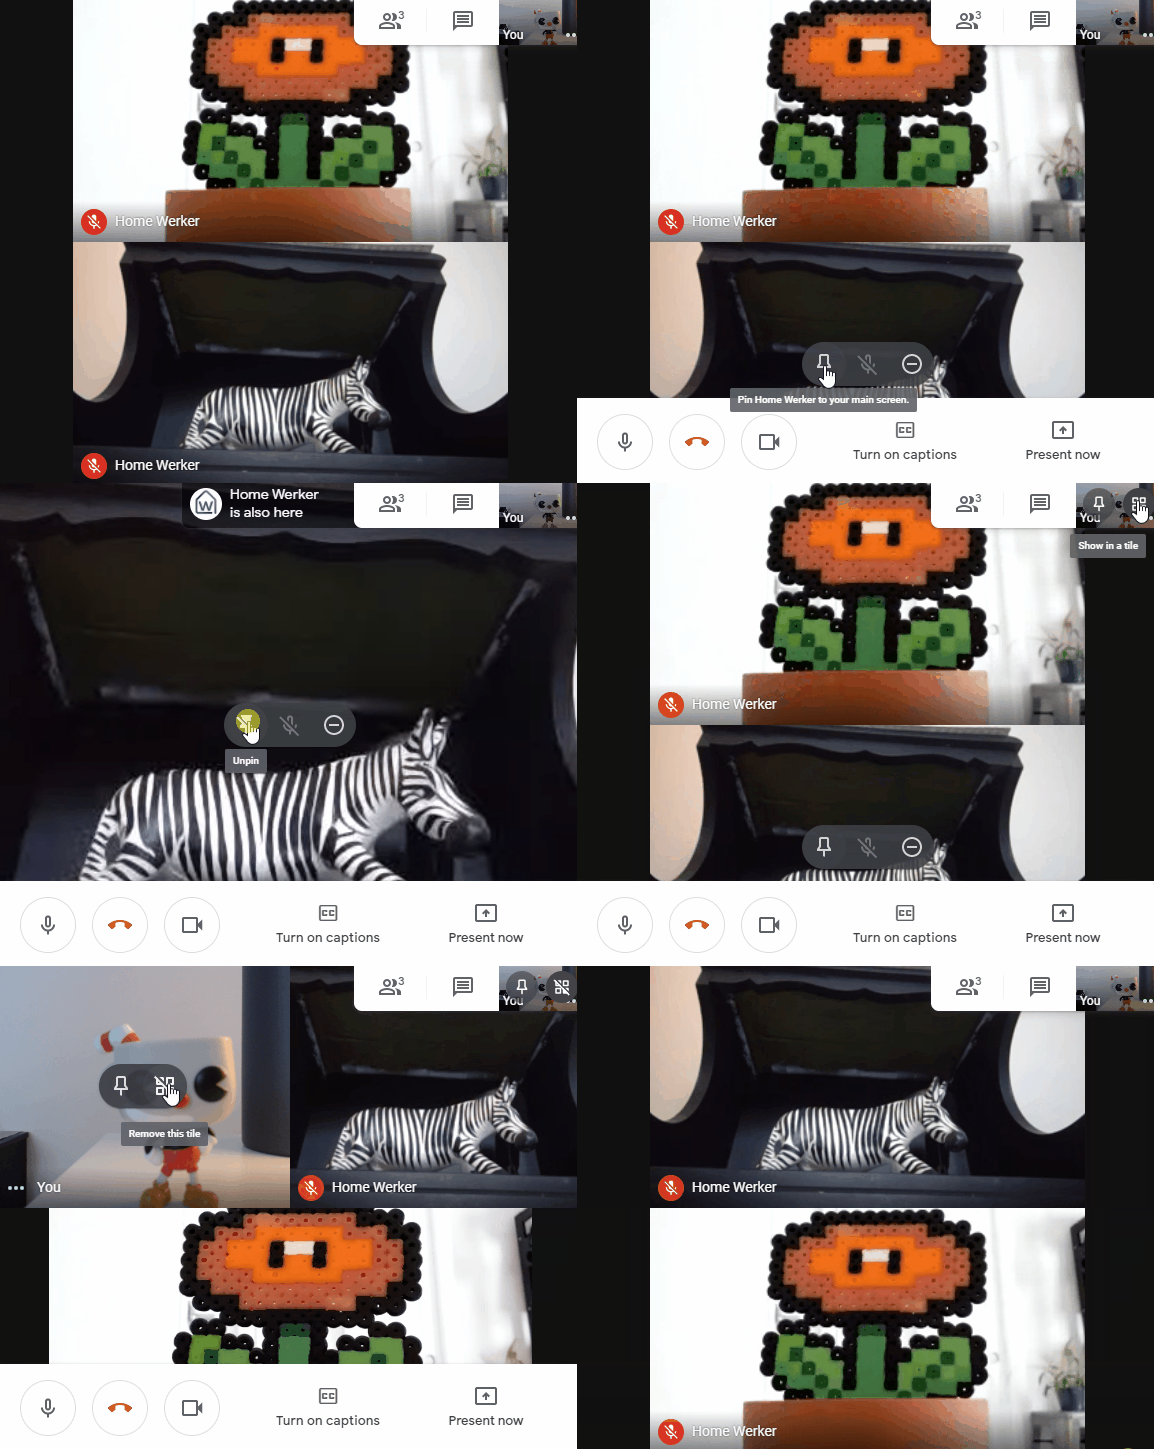
If you want to pin an attendees video (or even a screen they are sharing), hover your mouse over their video and click the pushpin icon. This will make that video always visible no matter what screen layout you are on. See the below example.
Turning off your own video
By default, Google Meet does not include your own video tile on-screen. But a lot of people like to be able to spot when they are making a dumb face, or their cat is lurking around in the video frame. To enable your own video, hover over your video in the top right of the screen and click “Show in a tile.” This will add your own video to the screen the same size as everyone else’s. This works very well when you are in the tiled screen layout.
How to blur or replace your background
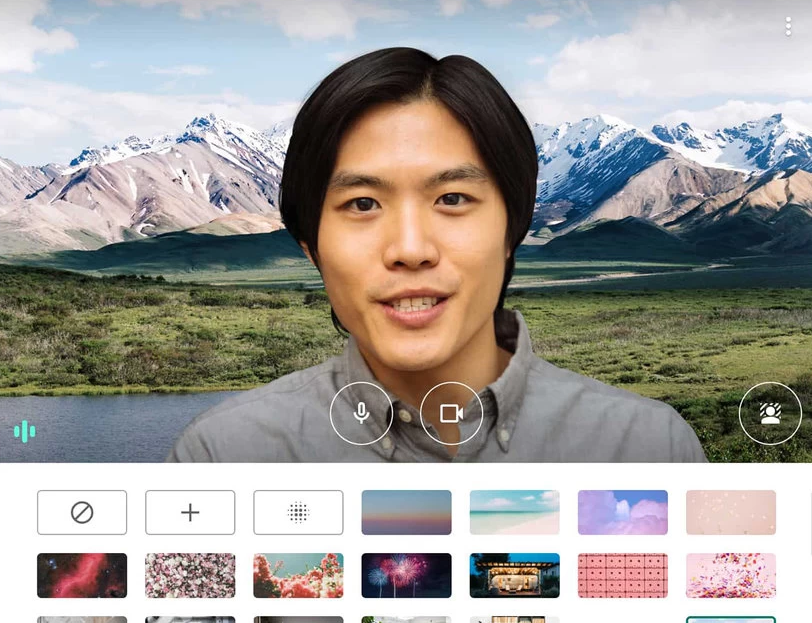
Sick of Zoom having all of the fun. Well, if you are on Google Suite Enterprise for Education, you now have access to custom backgrounds and blurred backgrounds. Simply hover over your own video, click the image that looks like a person, then select your custom background. Keep in mind that meeting hosts can also disable this functionality if they don’t want it in their meeting. So don’t be surprised if you can’t plop down the backdrop from the Starship Enterprise in your next lecture.
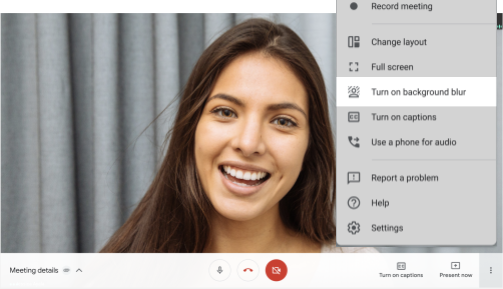
The background blur option is added to the little three dot menu in the bottom right where it says “Turn on background blur.” This will give your video a film-like effect where your background is blurred and your face is in focus.
Changing video quality
In the same three-dot settings menu, you can access video settings and then set your video output to either 360p or 720p. If you work with people with decent internet connections you can set your “send” and “receive” video to 720p. This will give you the best quality. If your connection is not great (for example, you are in a rural area), considering setting to 360p or even “audio only.”
How to share your screen in Google Meet
How to use chat
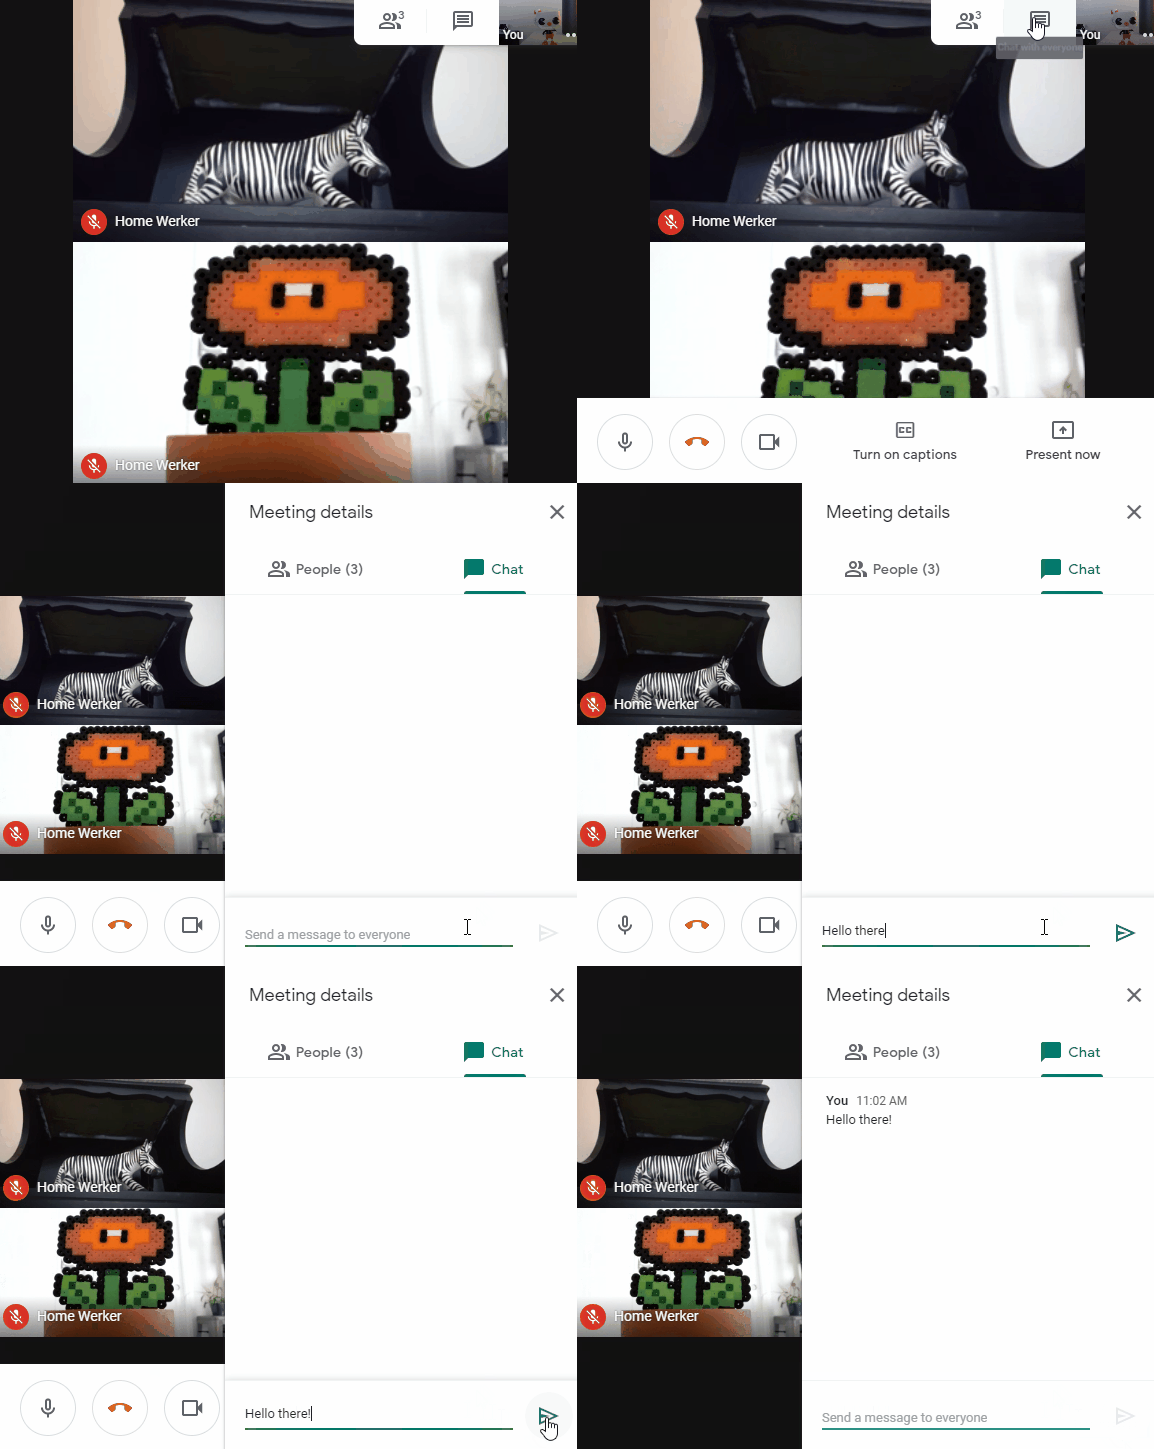
This one is super simple. Just go to the chat icon in the upper right of the screen. Here you can allow people to send text chats during a meeting. Links are also supported here for when you need to quickly share a document or website.
How to raise your hand
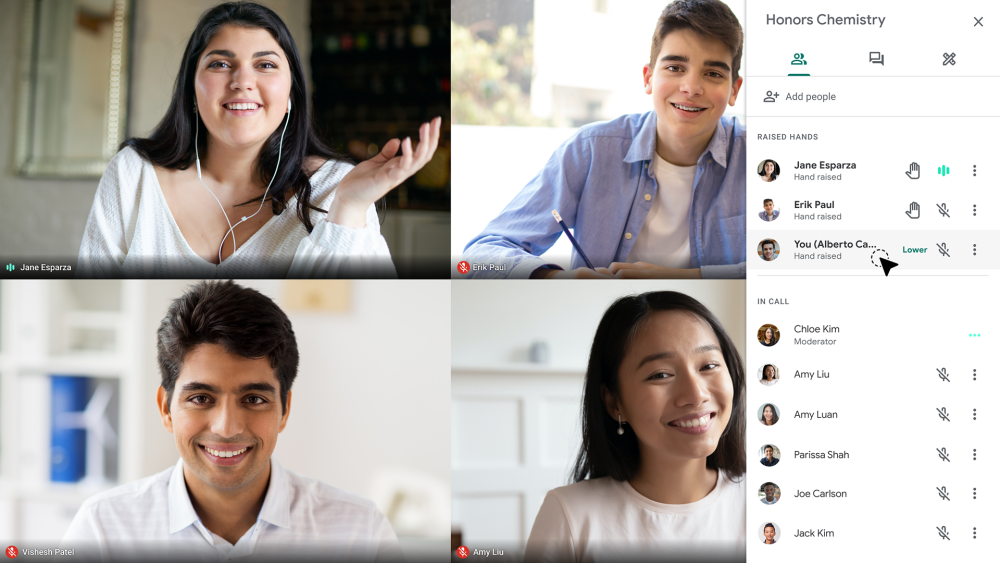
Hand-raising is a new feature that is available to Google Suite Enterprise for Education subscribers. In the participant tab in the right-hand menu, you will see a new section called “Raised hands” where presenters can keep an eye on who is requesting to speak. You can raise your hand in a meeting by hovering over your own video and clicking raise hand.
Muting participants
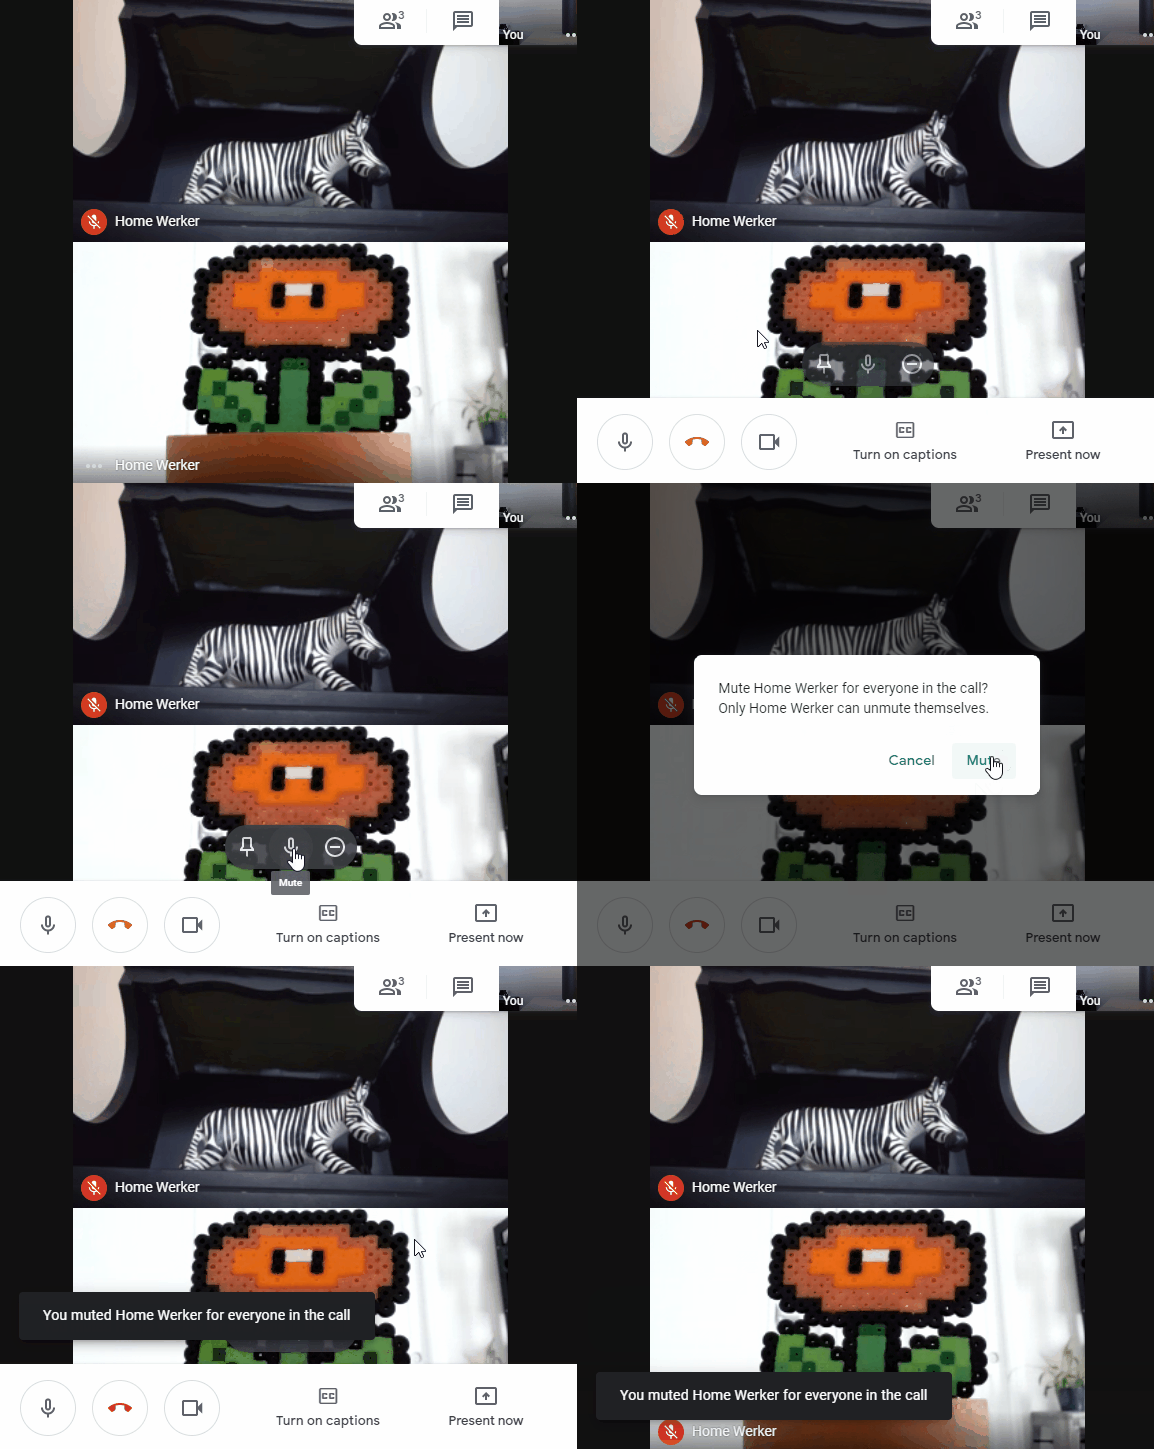
If someone is getting a little too noisy (dog barking, chewing, general annoyance), you can mute them. Keep in mind that you cannot unmute participants, you can only mute them. If you don’t see the option to mute it means that you are likely not the host of the meeting.
How to use Q&A
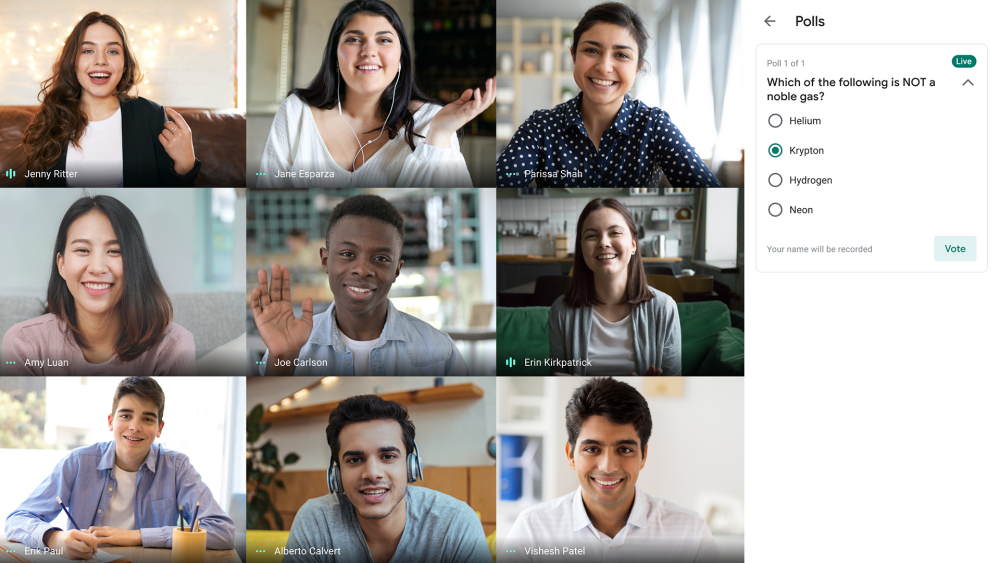
Q&A and polling are now part of GSuite Enterprise for Education accounts. This means you can now run simple polling and Q&A sessions during a meeting.
How to use Google Meet breakout rooms
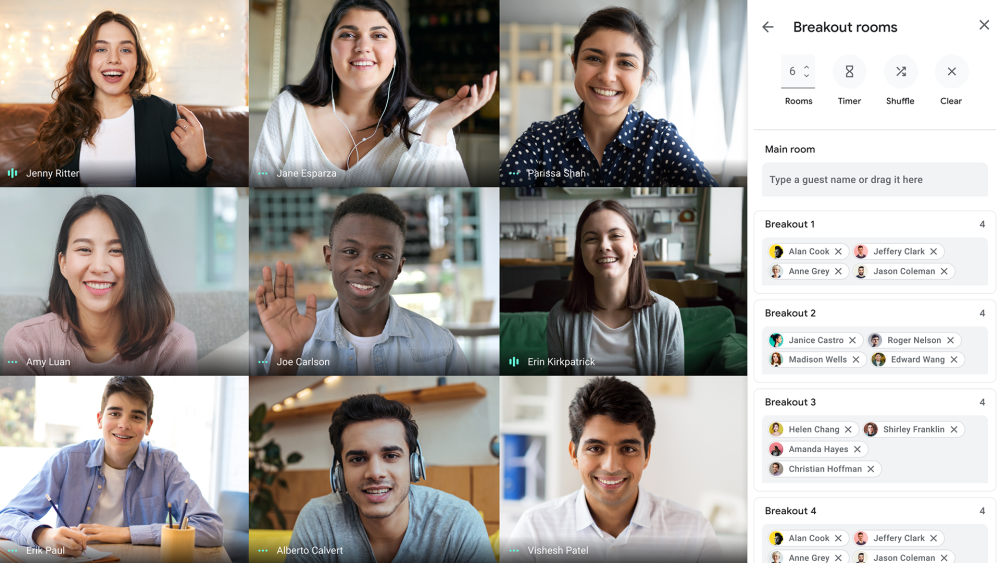
This has been a much-wanted feature that Zoom has had for a while now. Now it is here on Google Meet! Launching first for Gsuite Enterprise for Education, breakout rooms are an amazing way to break your attendees into smaller groups for discussion. You can set the number of rooms, who is in each, and how long the breakout sessions with run for. You enable these rooms if you are the host of a meeting in the participant tab on the right.
Enabling captions
Very simple. If you hover your mouse over the main screen, you will see a large button along the bottom that says “Turn on captions.” Clicking this will turn on automatic Google captions. They aren’t perfect, but for languages like English they do a decent job.
Recording your Google Meet call
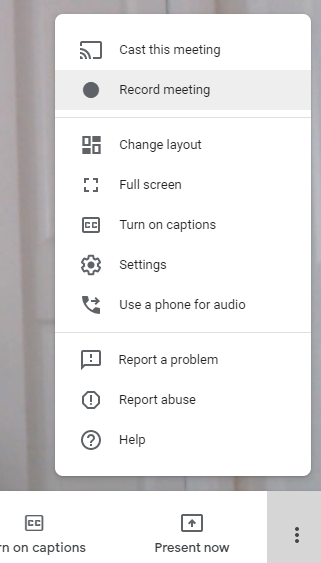
Many people want to record their meetings. If you have a GSuite for Education or Enterprise account then you can record your meeting directly into Google Drive for later watching. Enterprise for Education accounts also have automatic temporary recordings that keep meeting archives for 30 days. Below you can see the option available in the “three-dot” overflow settings menu in the bottom right of the Google Meet screen.
Casting a meeting with Chromecast
If you look at the image above, you will see an option to “Cast this meeting” which will enable you to send the video feed for your meeting to a smart display, or Chromecast enabled TV device. This is handy if you want to do a meeting on a larger screen. Keep in mind that you will still be using the microphone and camera on your original device.
How to use Google Meet on your phone or tablet
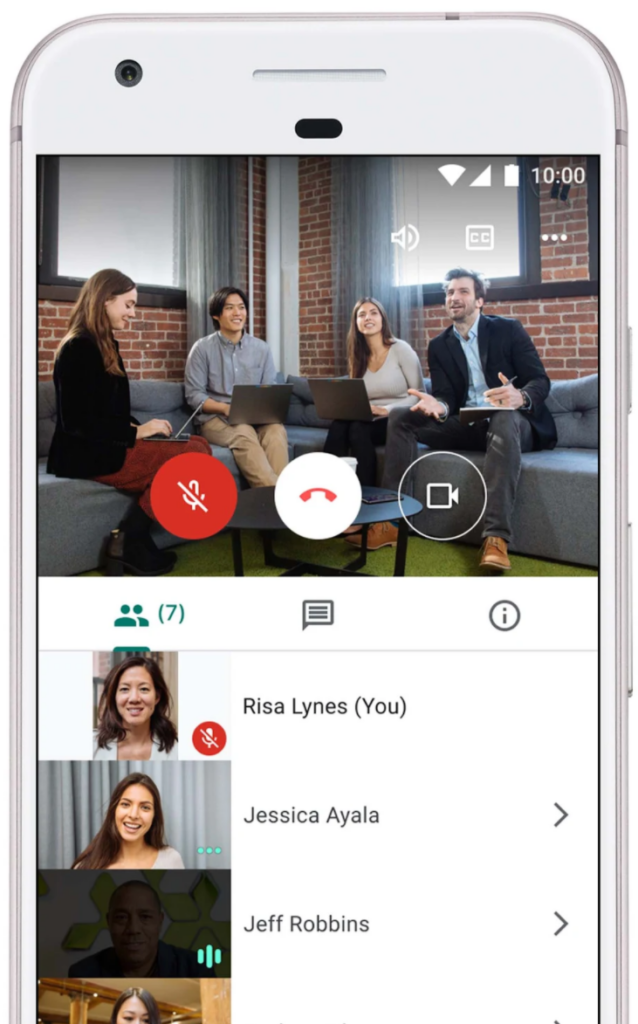
It’s as simple as downloading the Google Meet app in the Google Play or Apple App Store. Keep in mind that the experience will be more streamlined and you won’t be able to have as many people on screen at once (like on a desktop). But it is a surprisingly great experience for when you need to take a meeting when you are away from your desk.
How to join a call from a regular phone number
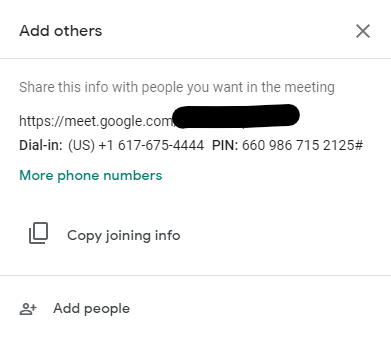
When you first join a Google Meet call that you have scheduled you will see a screen that lays out both the URL that you can send to people to join but also a series of phone numbers that can be called using a regular phone and a PIN code that will be used to enter the meeting. This feature may not be available in your country so check in advance. You can also find this info at any time during a meeting if you click the “Meeting Details” button in the bottom left of the screen. In our experience this feature works very well, routing people with poor internet connectivity right into your meeting.
Collaborate on screen with Jamboard
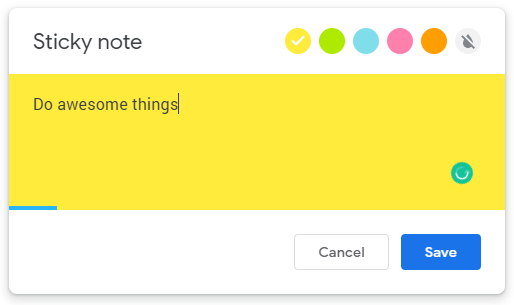
Jamboard is one of Google’s most underrated platforms. And recently it has been added directly into Google Meet Education accounts for collaboration. On Jamboard you can create cards for brainstorming and move them around/categorize them with colors. You can also just use this as a space for taking interactive notes during a session. Think of it as a virtual whiteboard. Once in a Jamboard on your meeting, you will see a shared whiteboard screen. Probably the most useful thing to do here is to create sticky notes. My teams have used these for quickly brainstorming ideas and color-coding them. As you can see below, you can create simple sticky notes with a set of pre-determined colors. We’re excited to see where Google takes this technology and when they will launch it on non-education accounts.
How to track attendance
A must-have feature for teachers is finally here. Attendance tracking! For those of you on a GSuite Enterprise for Education account, you will now be able to know who attended your class. This feature has yet to fully roll out but it is assumed that teachers will be able to access this data from the backend of their GSuite account.


1 Comment